Trekking poles and hiking staffs are standard equipment for many walkers, hikers, trekkers, backpackers, and snowshoers. The reasons why are simple: They enhance your stability and provide support on all types of terrain.
To get the most out of trekking poles or a hiking staff, follow these steps:
- Single or double? You’ll start by choosing between a pair of trekking poles or a single hiking staff.
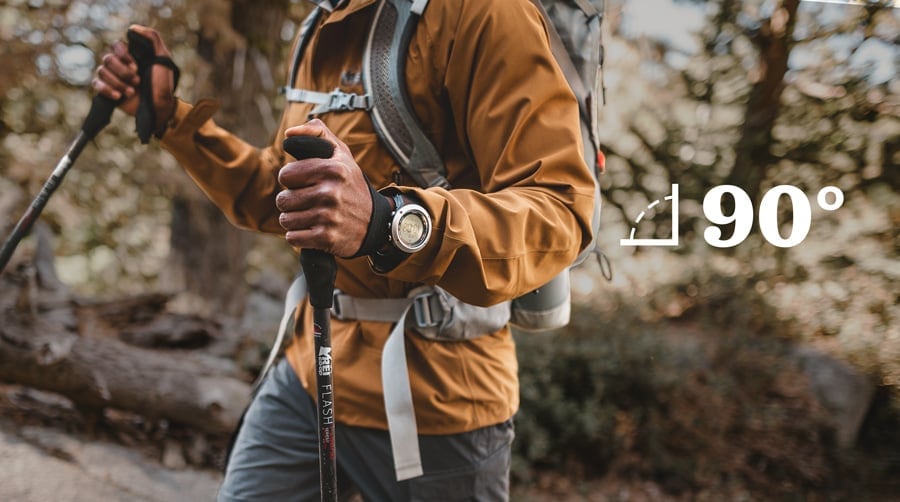
- Find the right length: You’re aiming for a 90-degree bend at your elbow when pole tips touch the ground.
- Choose features: Adjustability, foldability, shock absorption, weight, and locking mechanisms (for adjustable poles) are just some of the features and options that will guide your buying choice.
- Learn tips for using poles: Knowing a few handy tips, like how to use poles to get around obstacles in the trail, will get you on your way.
Note: While trekking poles and walking staffs might seem like a logical walking aid for urban use, you should never get them in lieu of a cane from a medical supply store. Trekking poles and hiking staffs are designed for people fit enough to travel in rugged backcountry terrain.
Types of Trekking Poles
Trekking Poles: Sold as a pair and used in tandem, trekking poles enhance your stability and can reduce the force on your knees while hiking and backpacking. Most are adjustable in length and some include internal springs that absorb shock to further reduce impact.
Hiking Staff: Sometimes called a walking staff or travel staff, this is a single-pole that’s most effective when used on relatively flat terrain and with little or no load on your back. Hiking staffs are adjustable and some include a shock-absorbing feature. They may also include a built-in camera mount under the handle so the staff can be used as a monopod.
Trekking Pole Length

Properly sized poles will put your elbows at a 90-degree bend when you hold the poles with tips on the ground near your feet. Many trekking poles come in adjustable lengths, which makes this easy to achieve. However, some are sold in fixed lengths or in ranges of sizes. Use these guidelines to help find the right length poles for you:
For adjustable-length trekking poles and hiking staff:
- If you’re taller than about 6 feet, choose a hiking staff or trekking poles that have a maximum length of at least 51 inches.
- If you are shorter than 6 feet tall, you’ll be able to shorten the most adjustable trekking poles and hiking staffs enough to make them work for you.
For fixed-length trekking poles:
Use the chart below and consult the manufacturer’s size chart that’s specific to the poles you’re looking at.
| Height | Suggested Pole Length |
| < 5 ft. 1 in. | 100cm (39 in.) |
| 5 ft. 1 in. – 5 ft. 7 in. | 110cm (43 in.) |
| 5 ft. 8 in. – 5 ft. 11 in. | 120cm (47 in.) |
| 6 ft.+ | 130cm (51 in.) |
Adjusting Pole Length
If you have trekking poles that adjust in length, it’s important to know what height to set them at. Improperly adjusted trekking poles can cause distress to your arms, shoulders, back, and neck.
For general hiking, adjust the length so that when you hold the pole with the tip on the ground near your foot, your arm makes a 90-degree bend at the elbow. This will be the right length for most of your hiking.
If you have poles with three sections, it’s helpful to set the top adjustment so it’s in the middle of the adjustment range and then set the bottom adjustment to the length that puts your arm at the correct angle. Then if you need to make adjustments while hiking, you can use only the top adjustment to fine-tune the length.
For long uphill sections, you can shorten each pole by about 5–10cm to get more leverage and more secure pole plants. The steeper the slope, the more you shorten your poles. Your trekking poles should assist you in moving uphill without causing strain or fatigue to your shoulders and your shoulders should never feel as if they are in an unnatural, lifted position or as if they are being pushed up into your backpack straps. If so, you need to shorten your poles even more.
For long downhill sections, try lengthening each pole by about 5–10cm from the length you set it at for general hiking. Doing so will keep your body more upright for better balance.
If you’re on a long traversing section, you can shorten the pole on the uphill side and lengthen the pole on the downhill side as needed to improve comfort and stability.
Trekking Pole Features

Depending on how you plan to use the poles, you may want to consider poles with some of these features:
Adjustable: Many trekking poles adjust in length to enhance stability on different terrain. They generally adjust from about 24 to 55 inches long. Typically you’ll want to shorten the poles when going uphill and lengthen them when going downhill.
Non-adjustable: Some trekking poles don’t adjust in length. These fixed-length poles tend to be lighter weight than adjustable poles because they operate with fewer parts, making them popular among the ultralight crowd. They are great for activities where you know you only need a certain length.
Foldable: Foldable trekking poles function kind of like tent poles rather than collapsing into themselves like adjustable poles. Foldable poles are typically the most packable and often are very lightweight and quick to deploy. They are especially popular among ultrarunners and fast hikers.
Shock-absorbing poles: These offer internal springs that absorb shock when you walk downhill. With most poles, this feature can be turned off when it’s not needed, like when you’re walking uphill. Shock absorption is a nice feature for any hiker, but is particularly recommended if you have unstable hips, knees, or ankles or have had any previous injuries to those joints.
Standard poles: These do not have a shock-absorbing feature and are lighter and less expensive as a result. While they don’t absorb as much impact when going downhill, they do provide a similar level of balance and support as shock-absorbing poles.
Ultralight: Ultralight poles offer the advantage of less swing weight, which makes them easier and quicker to move. Over the course of a long hike, this means less fatigue. Ultralight poles are also easier to pack. The pole shaft’s material is a key determinant of the pole’s overall weight. REI classifies ultralight poles as those that weigh less than 1 pound per pair.
Camera mount: Some trekking poles and hiking staffs include a built-in camera mount under the handle, enabling the pole to be used as a monopod.
Trekking Pole Locking Mechanisms
Whether adjustable in length or not, all trekking poles have locking mechanisms to keep the poles from slipping in length while in use. For non-adjustable poles, the mechanisms lock and unlock so you can extend them to full length for use and collapse them for stowing. Adjustable poles operate in a similar way, but the locking mechanisms also let you adjust the length of the two or three interlocking sections. This adjustability (which typically ranges from 24 to 55 inches) lets you adapt the poles to your height and the terrain.
Most poles use one of these four types of locking mechanisms:
External lever lock: A lever-based, clamplike mechanism that makes pole length quick and easy to adjust, even when wearing gloves.
Push-button lock: Poles with this locking mechanism snap into place and lock with a single pull. Press the push button to release the lock and collapse the poles. Some of these poles do not adjust in length.
Twist lock: Uses an expander and screw setup that is consistently strong and durable.
Combination lock: Some poles use a combination of the other locking mechanisms to achieve a balance of strength, lightweight, and ease of use. For example, a pole might use an external lever lock on the upper shaft and a twist lock on the lower shaft.
Note: All pole locking mechanisms can loosen over time, so always double-check to be sure they’re securely locked before you start hiking. On lever locks, this also means double-checking the clamping tension.
Trekking Pole Shaft Materials
The pole shaft’s makeup is a key determinant of the pole’s overall weight.
Aluminum: The more durable and economical choice, aluminum poles usually weigh between 18 and 22 ounces per pair. The actual weight (and price) can vary a bit based on the gauge of the pole, which ranges from 12 to 16mm. Under high stress, aluminum can bend but is unlikely to break.
Composite: These poles feature shafts that are made either entirely or partially from carbon. The lighter and more expensive option, these poles average between 12 and 18 ounces per pair. They are good at reducing vibration, but under high stress, carbon-fiber poles are more vulnerable to breakage or splintering than aluminum poles. If you hike in rugged, remote areas, this is something to keep in mind.
Trekking Pole Grips
Some poles and staffs include ergonomic grips that have a 15-degree corrective angle to keep your wrists in a neutral and comfortable position. Also, some hiking staffs have grips that look like the grip you’d find on a walking cane. This shape provides good support for casual walking and very light hiking.
Grip Materials
Cork: This resists moisture from sweaty hands, decreases vibration, and best conforms to the shape of your hands. If you sweat a lot and will be hiking in hot weather, go with cork grips.
Foam: This absorbs moisture from sweaty hands and is the softest to the touch.
Rubber: This insulates hands from cold, shock, and vibration, so it’s best for cold-weather activities. However, it’s more likely to chafe or blister sweaty hands, so it’s less suitable for warm-weather hiking.
Men’s, Women’s, Kids’, and Unisex Trekking Poles
Some trekking poles are marketed specifically for men, women, and kids, but the majority are considered unisex. The primary things that differ among men’s, women’s, and kids’ poles are length, weight, grip size, and color. In the end, buy whichever poles fit you best and have the colors and features you want.
Other Trekking Pole Considerations
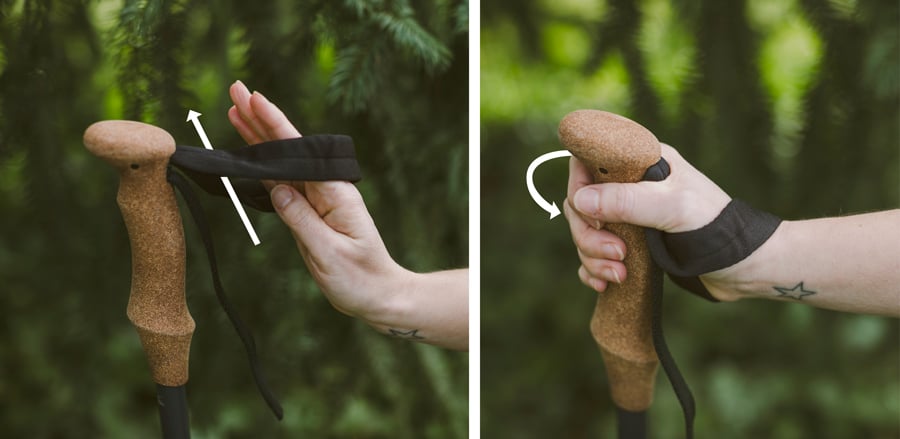
Wrist straps: It’s actually pretty common to see hikers using their trekking pole wrist straps incorrectly. To use them the right way, put your hand up through the bottom of the strap and then pull down and grab the grip of the pole. This technique supports your wrist and heel of the hand and allows you to keep your hand relaxed on the grip.

You can adjust the length of the strap so that when you bring your hand down on the strap it lines up with where you want it to rest on the grip. Proper strap adjustment allows you to let go of the pole to take a picture, grab a snack or adjust your backpack and then easily grab the pole again in the right place.
Note that many trekking poles have right- and left-hand specific straps, and that some have padded or lined straps to help prevent chafing.
Baskets: Trekking poles usually include a small, removable trekking basket at the tip end. Larger baskets can be substituted for use in snowy or muddy ground.
Pole tips: Carbide or steel tips are commonly used to provide traction, even on ice. Rubber tip protectors extend the life of the tips and protect your gear when poles are stowed in your pack. They are also good for use in sensitive areas to reduce impact to the ground. Angled rubber walking tips (usually sold separately) are for use on asphalt or other hard surfaces.
Tips for Using Trekking Poles
Fortunately, there’s a quick learning curve when it comes to using trekking poles. With a handful of tips and suggestions, you’ll be on your way.
Alternating Your Poles and Legs
Most hikers take to using trekking poles quickly and fall into the proper rhythm of planting the opposing trekking pole in time with the opposing foot (right foot, left pole, left foot, right pole, etc.) If you fall out of the rhythm, just keep walking while lifting your poles off the ground for a moment so you can reset. Start planting the poles again as soon as you’re ready. Soon this will become completely natural and you won’t even have to think about it.
Double Planting
Occasionally you might want to plant both poles at the same time and then take two steps, plant both poles again and continue. This can be beneficial on steep climbs or descents where you need the stability of both poles on the ground at the same time.
Walking Naturally
When using trekking poles, it’s best to walk naturally and maintain a natural arm swing as if you didn’t have poles in your hands. The poles may be angled slightly behind you so that as you plant them you can push off to aid your forward movement.
Negotiating Obstacles
Trekking poles can be very helpful when you encounter obstacles on the trail.
Stream and river crossings: Trekking poles provide much-needed stability when you have to wade through water. Make sure each time you plant your pole, it’s secure on the bottom before moving forward. If the water is deep, lengthen your poles.
Puddles: You can maneuver around them, using your poles for stability, or you can do a “pole vault” to the other side by planting both poles and hopping over.
Large rocks: For getting up and over large rocks, poles can give you a helpful push. To do this, plant both poles in the ground and as you step up on the rock, push on the poles to get you all the way onto the rock.
Logs: To step over a log, simply plant the poles in the ground and use them for stability. If you’re walking on a log to get across the water, you can use the poles to improve your balance by reaching them out to both sides (picture a tightrope walker using a large pole for balance).
Using Poles with Your Tent
Some lightweight tents and tarps require trekking poles for proper pitching. If you own one of these, make sure you have poles that work not only for you but also for your tent or tarp. Most often, adjustable poles will work best for tents and tarps because you can fine-tune the length to make setup easier.

trekking pole holding hammock
Authors:
Megan Green Wells
Megan Green Wells is an REI Co-op Outdoor School Market Coordinator in Northern California. She once injured a knee on a backpacking trip and relied on a friend’s trekking poles to complete the journey. She’s been a pole-user ever since.
——————
Erin Halpin
Erin Halpin is an assistant category merchant for backpacks and trekking poles at REI Co-op headquarters in Kent, Wash.


